The good thing about learning SSL is because SSL is one layer above TCP/IP (The transport protocol stacks) and below application layers such as HTTP, FTP, SMTP and blah, the concept is easily brings into new context.
I won't go deep into the major technical details of SSL in this post (maybe will do it in future posts), but there are a few jargons we need to share a common understanding. More information about these stuffs can be found in WIKI.
Certification Authority (CA) : A party designated to sign/issue digital certificates. Commercial CA such as Verisign.
Certification Revocation List (CRL): A list that stores the revoked/cancelled certificates
Digital Signature : A piece of information encrypted by the sender's private key.
Digital Certificate : A structure that complies to standards such as X.509 and includes also a digital signature
Certification Chain : A tree like relationship between signer CA, intermediate CA and ultimately the owner of the digital certificate.
Symmetrical Crytography : A branch of crytography focusing on shared keys.
Asymmetrical Crytography : A branch of crytography using non-shared keys to avoid key distribution issues.
SSL Handshake : A process in SSL protocol to establish SSL communications between SSL client and SSL server which includes negotiating algorithms, exchanging keys and encrypting messages.
SSL Key Store/Key Ring/Key Repository : A storage medium (usually a physical file) that keeps keys and certificates. Usually a password is needed to open the medium.
And many more terms as you delve into the realm.
I will assume the use of IBM Webpshere MQ6.0 and Windows XP.
In IBM Websphere MQ, SSL is only used during client mode communication. Bindings are direct and not involving SSL. More precisely, SSL can be configured for message channels and MQI channels. Message channels are meant for queue mangers (QMs)intercommunications and MQI channels are for MQ clients interaction with QMs.
Note: SSL is not used for access control purposes. In MQ, if you need to perform authorization checks, you might need to implement something called exits.
I will configure the following settings to demonstrate the usage of SSL for message channels (For MQI channels, it will be a future post by itself):
* 2 Queue Managers
* QM communications using Sender-Receiver channel pairs.
* 2 properly configured keystores, one for each of the QM.
The steps are:
- Creating MQ QMs
- Creating Key Stores
- Creating Self Signed Certificates
- Exchanging Certificates
- Configuring QM
- Creating and Configuring channels and listeners
- Test out SSL connections
Assume %MQ_INSTALL_PATH% = C:\Program Files\IBM\Websphere MQ\
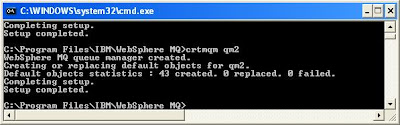
- Creating MQ QMs
Create 2 queue managers with name qm1 and qm2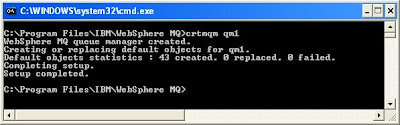
- Creating Key Stores
I will be using GSKit iKeyMan utility that comes with Websphere MQ. Otherwise you might want to use other similar tools such as OpenSSL. The keystore format is CMS and their file name is ended with a .kdb extension.
Command line version of iKeyMan is iKeyCmd (runmqckm)
To run iKeyMan, proceed to command prompt and execute
STRMQIKM
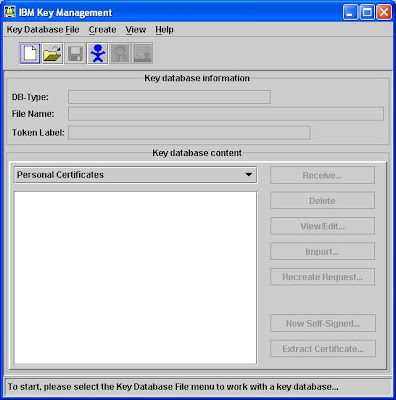

Then choose from the menu bar [Key Database File] -> [New]
Select [CMS] as the type, enter "qm1.kdb" as the file name as specify C:\ as the location for this example.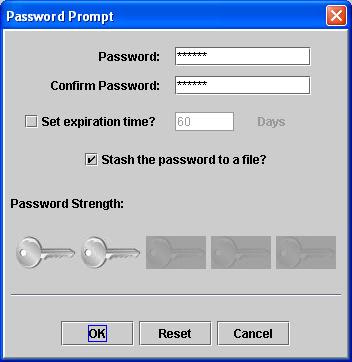
You are required to key the key store password to protect your key store and you must tick the [Stash the password to a file?] option.
The screen will looks like below once the keystore is successfully created and you can see that the iKeyMan preloaded some trusted CA certificates for you.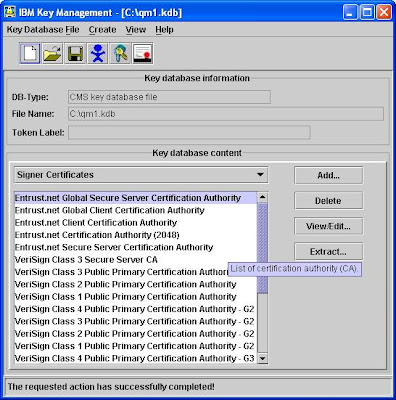
As one of the best practice, you should remove all the preloaded certificates and remain only those necessary to prevent potential security issues.
Repeat the above procedure for qm2's keystore with [CMS] type, "qm2.kdb" name and C:\ location.
I recommend you to open another instance of iKeyMan (strmqikm) to avoid confusion when switching between key stores. - Creating Self Signed Certificates
While you opened qm1.kdb in iKeyMan, from the [Key Database Content] filter, select [Personal Certificates], see below: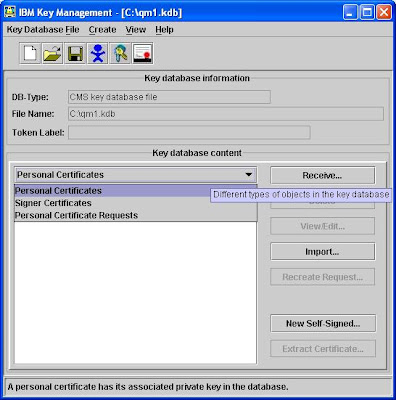
Click on the [New Self Signed] button at right hand side and fill in the form like the screen below: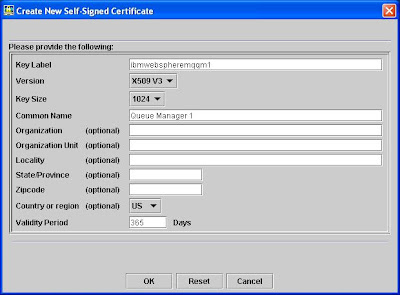
In Windows platform, MQ will use the key label to identify which certificate to be used to authenticate a queue manager.
The key label must be prefixed with "ibmwebspheremq" and then concatenated with the queue manager name, in this example "qm1", all in lower case. Here the key label is "ibmwebspheremqqm1".
Repeat this step for qm2.kdb keystore but with the key label "ibmwebspheremqqm2". - Exchanging Certificates
In the same screen, select [Extract Certificate] button.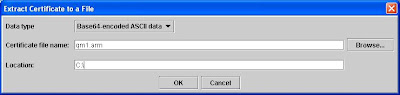
For ibmwebspheremqqm1 certificate, extract it to C:\qm1.arm
For ibmwebspheremqqm2 certificate, extract it to C:\qm2.arm
For qm1 keystore, import C:\qm2.arm by selecting [Signer Certificate] from the [Key Database Content] drop down and click [Add]. Specify "qm1.kdb" and C:\ as the location and when you click [Ok], a [Enter a label] message will prompt you to specify a label for the to-be imported signer. Enter "ibmwebspheremqqm2" and press [OK]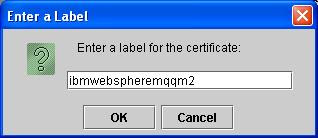
The qm2 certificate will appear as one of the signer in the list.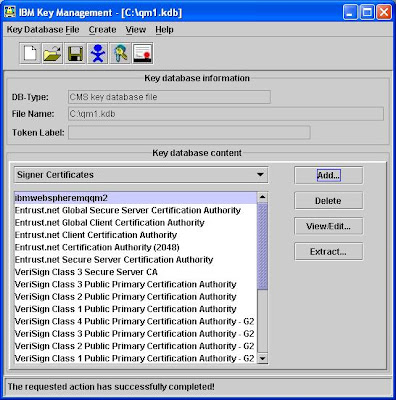
By now, your settings should be:
-qm1.kdb (Keystore for Queue Manager qm1)
--ibmwebspheremqqm1 (Personal Certificate for qm1)
--ibmwebspheremqqm2 (Signer Certificate for qm2)
-qm2.kdb (Keystore for Queue Manager qm2)
--ibmwebspheremqqm1 (Signer Certificate for qm1)
--ibmwebspheremqqm2 (Personal Certificate for qm2) - Configuring QM
I will use RUNMQSC command line utility to perform most of the configuration. Of course, you can use MQ Explorer.
Execute
STRMQM qm1
STRMQM qm2
to start both of the QMs.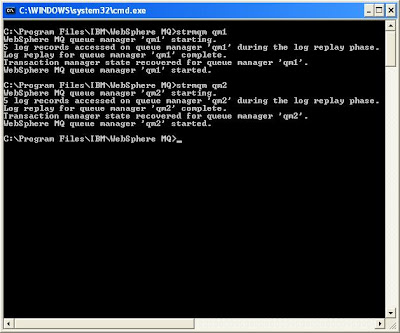
Execute
RUNMQSC
to enter MQSC interactive session for qm1.
Check out the current SSLKEYR attribute by executing
DIS QMGR SSLKEYR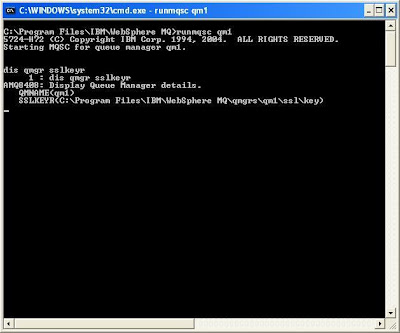
By default, the value should be C:\PROGRAM FILES\IBM\WEBSPHERE MQ\QMGRS\qm1\ssl\key
We will change it to point to our qm1.kdb.
Exexcute
ALTER QMGR SSLKEYR('C:\qm1')
Note: Do not include the .kdb extension in the value of SSLKEYR.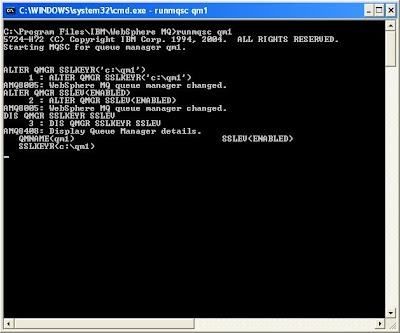
Note: I recommend you to open another instance of command prompt to work with qm2.
Repeat this step on qm2.
RUNMQSC qm2
DIS QMGR SSLKEYR SSLEV
ALTER QMGR SSLKEYR('c:\qm2') SSLEV(ENABLED)
DIS QMGR SSLKEYR SSLEV
END - Creating and Configuring channels and listeners
Execute commands below for qm1.
DEFINE QLOCAL('qm2') USAGE(XMITQ) TRIGGER INITQ(SYSTEM.CHANNEL.INITQ) TRIGDATA('TO.qm2')
DEFINE LISTENER('LISTENER.TCP') TRPTYPE(TCP) PORT(10001)
DEFINE CHANNEL('TO.qm1') CHLTYPE(RCVR) SSLCIPH(RC4_SHA_US)
DEFINE CHANNEL('TO.qm2') CHLTYPE(SDR) CONNAME('localhost(10002)') SSLCIPH(RC4_SHA_US) XMITQ('qm2')
START LISTENER('LISTENER.TCP')
REFRESH SECURITY TYPE(SSL)
Execute commands below for qm2.
DEFINE QLOCAL('qm1') USAGE(XMITQ) TRIGGER INITQ(SYSTEM.CHANNEL.INITQ) TRIGDATA('TO.qm1')
DEFINE LISTENER('LISTENER.TCP') TRPTYPE(TCP) PORT(10002)
DEFINE CHANNEL('TO.qm2') CHLTYPE(RCVR) SSLCIPH(RC4_SHA_US)
DEFINE CHANNEL('TO.qm1') CHLTYPE(SDR) CONNAME('localhost(10001)') SSLCIPH(RC4_SHA_US) XMITQ('qm1')
START LISTENER('LISTENER.TCP')
REFRESH SECURITY TYPE(SSL) - Test out SSL connections
You can now test the connection by starting sender channel in each queue manager manually.
To do this in qm1, execute the following:
START CHANNEL('TO.qm2')
DIS CHSTATUS('TO.qm2')
To do this in qm2, execute the following:
START CHANNEL('TO.qm1')
DIS CHANNEL('TO.qm1')
If the channel communications are successful, you will get screen similar to the one below: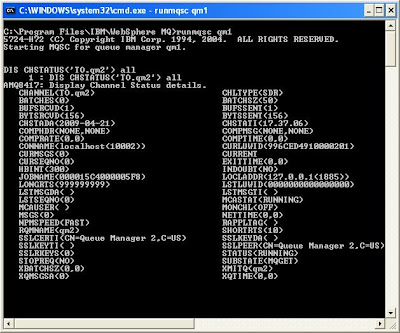
Pay particular attentions to the attributes
STATUS=RUNNING
SSLPEER=
SSLCERTI=
Note: If you need to change any of the SSL related attributes like key store location and channel SSL settings, remember to issue the following command:
REFRESH SECURITY TYPE(SSL)
Note: To troubleshooting problems, you can check out the QM error logs located at %MQ_INSTALL_PATH%\QMgrs\qm1\errors\


No comments:
Post a Comment